
I'm going to cut out the jargon, there are NO affiliate links, no forced email list sign ups or selling in this post, just me sharing my tips.
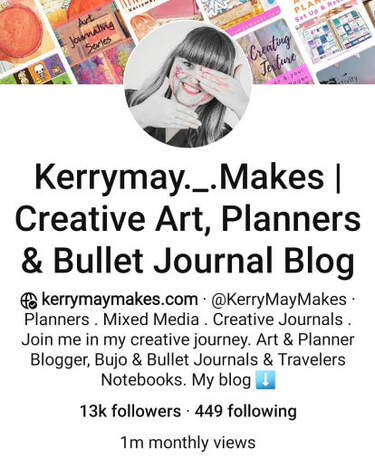
Firstly have a look around my Pinterest Page Kerrymay._.Makes Pinterest The below information and stats are from 2017, when I hit 200,000, I am now on one million page views a month on Pinterest. 1. Prepare Your Blog With Google Analytics
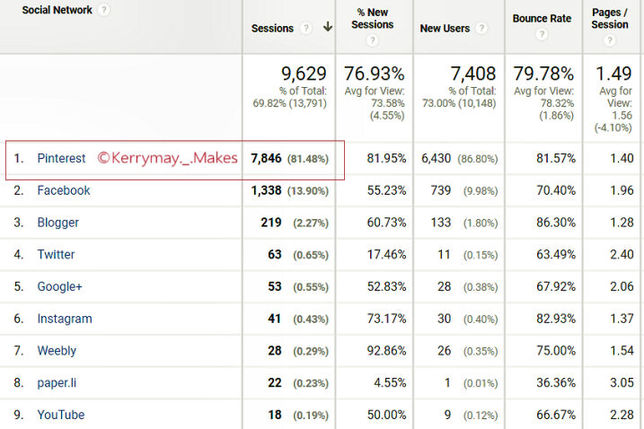
So you've got your blog and want to try to gain page views... the first step is to sign up to connect Google Analytics to your blog. It is easy to sign up, just visit the page and create an account, this will now start monitoring your blog traffic. Bookmark the page so you can check on your web page/blog stats. I use the Acquisition tab for most of my analysis and then click social links and or referrals to see how many visitors I have to the blog and where they are coming from. Below is the social acquisition for the last 4 months from May to August and you can see that Pinterest has dominated my page views with very little effort from me. I spend more time promoting on Facebook than anywhere else.
My blog is coming up to a year old and I'm so proud to have achieved almost 20,000 visits and over 33,000 page views in that short space of time. I used to have a successful website years ago and that had a total of 800,00 page views, but that was over the course of around 8 years and it was a slow process driving traffic to the site. Below you can see how my Monthly visitors have grown since I started taking Pinterest seriously.
Update August 2019: My blog is now almost 3 years old and I currently get above 300 views a day or around 10,000 pageviews per month, even getting 20,000 when a pin went viral. 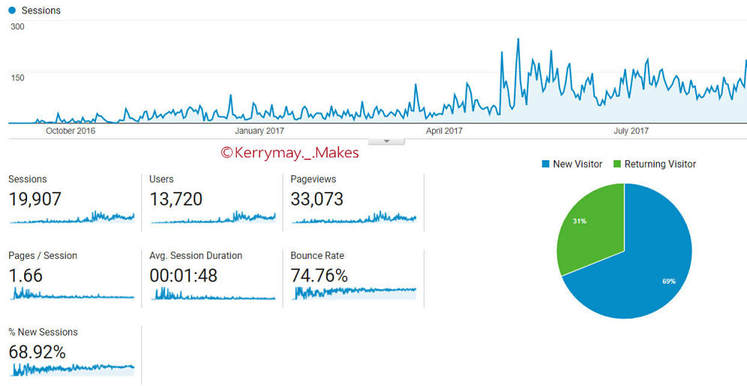
2. Add SEO Descriptions and Keywords to your blog post
I promise to keep these short... SEO is so important for your blog traffic. Make sure whenever you hit publish or schedule that you have got a title in the SEO section and a description that tells people what the post is about, this will automatically add the description when you pin to Pinterest. Use keywords and long tail keywords that might make searching for your content easier.
For example if I am posting about a planner set up, I would use a detailed title in the SEO section that explains more about it, such as Planner Setup - How I Use My Travelers Notebook. This adds extra search criteria, words and categories to your post. If lots of people are searching for planner setup, you need to be sure your site is seen, so adding more keywords increases those chances. You can read more about long tail keywords and why we should be using them on ahref's blog: long-tail-keywords-research Post titles are important in your Google and Pinterest ranking. How to... or posts with numbers such as 5 ways to... perform better in searches. The description should then have keywords such as planner setup, plan with me in my Travelers Notebook etc, this all helps to narrow down the search and opens it up to a wider audience. 3. Pinterest Set Up
Add around 15-20 different boards to start with and have a board for your best blog posts. Make sure the boards all fit in with your overall blog niche or category. People who are interested in your blog want to see relevant pins, not pins about plumbing if you have a blog about art. If you do want to keep boards that are personal you can set these as secret boards in the board settings. Don't have too many boards, it can be overwhelming for you and followers.
Set your Pinterest account up with a detailed (keyword rich) description, add a suitable and searchable name for each board and add category and description for each board (through clicking board settings which is the pen icon). Make it all look pretty and consistent (I go for pastel and bright colours for my main board image to make it visually pleasing for the visitors). Set the board image again in the settings (you can only do this on a pc or laptop). I will discuss Rich Pins and getting a business account in the next part of the series. 4. Use Tall Pins, Canva and Visme
Tall or long pins do better than small images. The second and third images above are my most re-pinned pins from my blog. They have over 8,000 re-pins between them in just a few months and most of my blog traffic comes from these posts. Use a free program on your pc called Canva - Create logos, banners and website graphics. It's an amazing image editor that provide free to use templates for all your web graphics needs.
Sign up for free here Canva - Design for Everyone Select Pinterest Graphic and have a play with the templates and try to use your own images to make them stand out from others. Bright and pastel coloured pins perform better than dark or blue (cold colours). Apparently they get up to 60% more pins. Visme: If you want to create long infographics then the tool you need is Visme. This is a great tool for any social media graphics, but the infographic feature is particularly strong. Check them out here - www.visme.co. Read here for a cool feature they have for creating statistical on your website. 5. How to Pin and Where to PinDon't just pin your own pins, it is important to pin useful content to other boards too, try to link these to your niche. Boards with high quality pins that have a high pin count will do better and get more views.
Pin Consistently and Often, this goes without saying. You can't pin a post once and expect it to be re-shared. You need to get it out there, pin it often and re-pin it to a few boards spaced out over several days and weeks. You can and should pin to group boards, but currently Pinterest likes you to add content to your own boards.
I often re-pin pins that have dropped down my board and then delete that pin after re-pinning, this refreshes the pin and brings it back to peoples feed. Try to have around 50-100 high quality pins on each of your boards as this will get you more viewers. It is advised to pin around 15-35 pins a day, a mix of your own and others, it sounds a lot but it is worth doing, besides which I enjoy browsing and pinning. Pinterest also now favours 'fresh pins' - these are new image pins that haven't been pinned before, but they can link to a previously pinned url. So get creating new pins and new content. If you do add to group boards, then make sure they are boards that are in your niche, don't have too many pinners, but have a high follow count. Get rid of badly performing pins - higher pin counts do matter. I prefer manual pinning, but more on this later... told you this was an epic series! If a pin is doing well keep re-pinning it to a variety of different boards and group boards (more on these in the next series).
Phew, I hope you got all that. These are just the beginners tips, give them a go, have a tweak and let me know if they have helped you. You should start seeing the changes to your traffic straight away.
Take Care, Kerry xx
Related Posts:
Blog Planning Organisation and Planning Goals for 2018 Blog Planning, Organisation and Productivity
Please pin me to Pinterest
7 Comments
11/10/2017 01:17:56 am
Hi! 16/1/2018 09:13:57 pm
I love this post! I found it through your link on Facebook and have saved it as a refence :)
Kerry
9/3/2018 05:02:47 pm
Thank you Jen, glad you found it useful xx 29/10/2023 04:04:57 pm
Your Post is very well and I am very impress on your website keep again same posting. >>>>>>>>> Leave a Reply. |

BLOG AUTHORHi I'm Kerry a Notts UK blogger, planner, art & creative journal fanatic. Make a cuppa and browse my tutorials and makes. 
Categories
All
Follow me on Bloglovin'

Save my button to link back to my site
|


 RSS Feed
|
Thank you for reading.Contacts:For business and private enquiries: [email protected]
Privacy/Disclosures
About / Contact Resources Library Planner Shop Discounts Facebook Blog Page - Follow the latest posts |